A proper backup strategy is something that distinguishes pros from amateurs–or at least the wise from the unwise! Don’t you hate it when you lose days/months/years (!!!) worth of work because your hard drive died and your files are gone? You share your pain on Facebook groups and while the first few replies are sympathetic, you quickly get smacked over the head with the truth: “You should’ve backed up.”
In this article, you’ll learn how to save yourself time, frustration, and money by never losing files. Even more importantly, you won’t lose your client’s files or their trust.
Story #1
I remember when I moved from Windows to macOS and I wasn’t used to how things run in the new environment. I had backups of all my projects on an external hard drive, and that was my whole backup strategy.
At one point, I wanted to restore a few projects from my external backup drive back to my main drive. In the past, when Windows asked whether I want to merge the folders and their contents or not, I simply clicked “Yes” and all went well. When my new macOS machine asked me if I want to replace the files, I simply agreed to it. My old Windows habit of clicking “Yes” lead me to delete every song I had ever written. ALL OF THEM.
After spending some time sulking that I had lost my songs, I moved on. Hey, things happen. The time spent sulking meant not writing for another year and a half or so. Good thing nowadays I’m a mixing and mastering guy, eh?
So, don’t you put off sorting out your backup situation like I did. Procrastinating is always a bad idea. There are two more disaster stories at the end of this article, and if this one didn’t do it, they will most likely convince you to save your future self a lot of time, frustration and money.
Be your future self’s best friend, will ya?
Keep Your Drives Organized
The way you arrange your files in your system is very important for your peace of mind and overall efficiency. Proper file management and keeping track of where every file lives will end up saving you a lot of time over the course of a year. For instance, a simple organization strategy would be like this: Create two parent folders, named “In Progress” and “Finished Projects.” Each time you begin a new project, simply create a subfolder in the “In Progress” folder named for the artist, client or project. After you finish the project, move that artist folder to the “Finished Projects” folder. This method makes finding particular projects very simple. Naming files and folders is also an important consideration and we will get to that in a bit. For my music projects, I have a dedicated “Work Drive” that houses three parent folders:
Folder 1: A_Work_In_Progress
This folder contains subfolders such as:
• Mastering
• Mixing
• Practice
• Production
• Recording
Folder 2: Finished
This folder, unsurprisingly, is where I archive finished projects. This folder contains the same subfolders as A_Work_In_Progress.
At the end of every project I create some files to be archived and possibly delivered to the client:
1. Bounced/rendered/exported stems
2. All tracks in the session are frozen/committed
3. All related project folders are moved into the main project folder
4. The project folder is compressed so that no audio files get misplaced.
Folder 3: On_Hold
This folder has random projects that are on hold for one reason or another. Self-explanatory, I know.
Folder Hierarchy
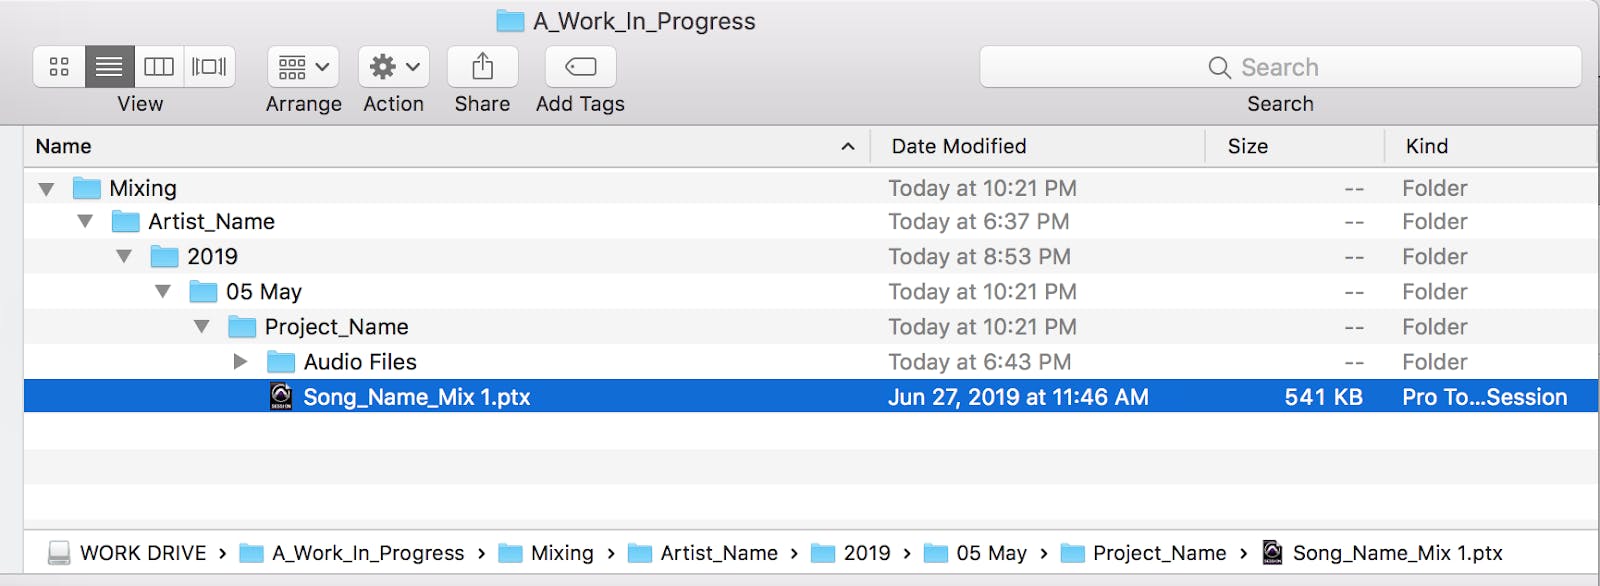
In my case, each of the three parent folders contains artist folders labeled with the artist or contact person’s name. Inside each artist folder I have subfolders labeled for the year I received the project. Each year folder contains folders for each month in which I had a project. I number the month folders sequentially to make it easier to find them. Below is an example of my folder structure (Don’t judge me, one can dream):
BAND NAME > YEAR > MONTH > PROJECT NAME > SESSION
Phil Collins > 2019 > 05 May > Album 9 > Song_1
Example folder structure:

File Naming Conventions
Consistency is an important element of organization, so I stay consistent with my folder structure and how all my files are named. To that end, I use NameChanger for my batch renaming needs within macOS, and AdvancedRenamer when working in Windows. Here are some of my batch renaming actions:
- Remove the “_01” suffix from files exported from Logic Pro or Pro Tools. My_Song_final_01.wav becomes My_Song_final.wav
- Remove number prefixes from the audio files, like 01_Kick, 07_Tom5, etc.
- Conserve characters by using reasonable abbreviations. I replace the word “guitar” with “gtr”, as in El gtr, Ac gtr, Gtr clean, etc. Short file and track names allow the names to be more easily displayed on crowded screens.
How to properly backup: The 3-2-1 Rule
Follow the 3-2-1 backup rule. The 3-2-1 backup rule is an acronym for a sure-fire strategy to keeping your data safely backed up.
• Keep at least 3 current copies of your data
• Store 2 copies on different storage media
• 1 of the copies must be stored offsite
3 copies of your data means that you have your primary data and two backup copies. Remember that all storage devices fail at some point and using different types of storage media decreases the likelihood that multiple backup copies will fail at the same time. Therefore, the two backup copies should be different storage types, like external SSD or cloud storage.
Disasters such as fire, theft and floods can destroy all local backups. This means you must store one of your backups offsite. Cloud storage subscription with companies like Backblaze, Carbonite and IDrive provide secure, offsite storage plans with automated backup options. Alternatively, your offsite backup can simply be a drive that you take home with you each night. If you work at home, you could keep that drive at a family member’s home or in a secure storage area in a separate building, like your garage.
Putting It All Together
For audio professionals, your backup strategy could look something like this:
• Your audio/session drive should be a separate drive from your system drive–don’t cheat on this, even if you work on a laptop.
• Your audio/session drive should be synced to a cloud-based backup service that is constantly backing up your data.
• Create a backup schedule with Carbon Copy Cloner or ChronoSync to clone your work drive to a backup drive, which is attached to your system or your local network.
Here is how I setup my system and backup workflow:
Backup 1
CarbonCopyCloner backs up the entire A_Work_In_Progress folder, hourly, to my local Google Drive folder. As you might expect, my Google Drive folder automatically syncs and uploads to Google’s cloud servers.
Backup 2
CarbonCopyCloner also clones A_Work_In_Progress to my “Work Backup” drive.
Backup 3
Backblaze online backup is set to continually backup A_Work_In_Progress folder to a secure cloud storage server.
While the 3-2-1 backup rule is not 100% fail-safe, it is the best practice recommended by US government authorities such as the United States Computer Emergency Readiness Team. IT security experts also recommend this strategy as the best way to keep your data safe from disappearing off the face of the Earth.
Manual vs. Automatic Backups
You could backup manually, but this means you must remember to do it. Automating the backup process with a software solution ensures consistent backups and reduces the stress of having to remember to backup. I use CarbonCopyCloner on the Mac to automate all my backing up. Acronis True Image looks like the comparable software for Windows.
Keep Older Versions of Your Files
It’s very important that your backup solution maintains multiple versions of your files; meaning older versions are kept, even when newer versions are backed up. What if you accidentally delete an important file before you backup or simply wish to go back to an older version of your project? Versioning to the rescue!
System Drive Backup
Backing up your project data is vital; however, do not neglect to backup your system drive. Backup programs like CarbonCopyCloner and Chronosync can create a bootable clone of your system drive. A bootable clone can be a godsend if your system drive fails or becomes corrupt. If you have a bootable backup, you can simply swap your boot drive, restart, and you’re back to work.
For both versioning and system restore, one could use Apple’s built-in Time Machine utility. For things like restoring previous copies of a file, I find Time Machine easy to use, surpassing both Backblaze and CarbonCopyCloner. However, Time Machine will not create a bootable backup of your system drive and is not the most efficient solution for backing up audio drives.
In Conclusion
Spend the time to develop an organized drive and folder structure.
(Re)name your files so that they work for you, and not against you.
Most important of all, is to backup properly, using the 3-2-1 rule.
Do not wait until disaster strikes before you take this seriously.
Retrieving old sessions for a client not only adds value to your services but also earns you some brownie points. In fact, you’ll earn brownie points even if you charge for the service!
Please backup. Now. Be your future self’s best friend, will ya?
Story #2
Once upon a time, there was this super awesome music producer called Patch. He was asked to record a few songs for the incredibly talented Nicola Brown so he called upon some of his most trusted engineer friends, Kevan and Tiki. Together they recorded a beautiful sounding drum kit – one of the best sounds ever captured by anyone, ever.
Patch, being the lovely, caring person he is, decided to collect the session files the following day as it was late and everyone wanted to go home. Alas, on his return he found no trace of the Pro Tools project recorded the previous evening. Gone were the 6 hours worth of audio. Gone was the best drum sound ever. Gone was some nice sounding acoustic and electric guitars. Gone was Patch’s happiness.
Close to tears, he booked the studio for the following week and re-tracked the whole EP. It sounded much better but was still a huge headache. So remember kids, always backup your sessions, no matter what. – Patch Boshell
Story #3
A few months ago I got an external hard drive specifically to transfer work between my office computer and my laptop. At first, I was copying and pasting the work between the computers and the external hard drive, effectively creating 3 backups. As time went by I got lazy and started working directly from the external hard drive instead.
You can predict what happened next! External hard drives are fragile.One fateful day I dropped it. When I plugged the drive into the computer it refused to mount at all! Imagine how furious I was with myself. I had to recreate a bunch of client work and wasted too much precious time…and money. – Matteo Depares


