This article goes along with the article “Creating Ambience and Depth with Reverb.” As with that article, At the end of this article is a glossary of some terms that you may not be familiar with.
Precise control over sound is a priority for music producers and engineers when crafting a finished music mix. Time delay effects have always been a favorite and distinctive sound treatment for all genres of music. Your mixing style and the music itself dictates whether effect treatments (both delays and reverbs) are more felt as an overall euphonic enhancement (sense of space or depth) or heard as a stylistic element of a genre such as slapback echo on vocals in old ’50’s Rock n’ Roll music.
When conceptualizing a time-delay effect for vocal, guitar or any source in a mix, it could be helpful to think about how sound actually behaves in a real room. The natural world is always a good starting point and you may elect to have delays sound natural, otherworldly, or somewhere in between if you like.
Sometimes, you’ll see recording engineers clap their hands or just sing out loud when they first walk into an unfamiliar control room or tracking room. By energizing the inherent acoustics of a room with percussive handclap attacks, a seasoned ear will immediately appraise how sound works in that room when tracking musicians and/or mixing music.
The different materials used for constructing the walls, ceiling, and floor change the overall amount of reflectivity. Sound’s timbre is governed by which frequency bands are absorbed more or less. A room that absorbs high frequencies will have a darker sound as compared to a room that absorbs more bass, which will have a thinner sound and may also emphasize middle frequencies.
Time Delay Devices—Brief History
Analog tape recorders are one of the oldest technologies used to delay audio signals for effect. The physical distance between the record head and playback head and the speed of the moving tape determine the delay time in milliseconds. To get a specific delay time is easy with today’s software delay plugins but with a tape recorder, you are limited by the speed of tape moving and changing that speed was the only way change the delay time—slower tape speeds produce longer delay times and vice-versa. If you can physically move the head-to-head distance, then you have another way to change the delay time.
Tape-based delay machines like an Echoplex™ have movable playback head(s) so you could change the delay time easily and match the song’s tempo if you desire. The tape loop used ran at a constant speed.
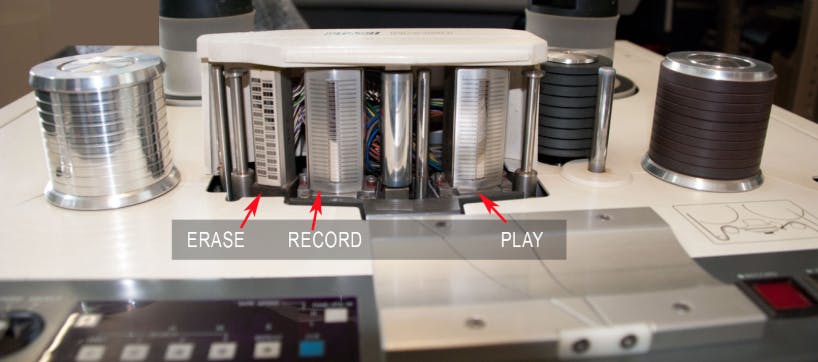
Pictured: Analog Tape Heads As the tape moves from left to right, a signal recorded by the record head gets played back a few ms later in time by the play head. The tape speed can be varied and faster tape speeds create short delay times while slower tape speeds increase the delay time. Feedback is created by sending the playback signal back to the record head.
Effects units with analog delay lines using solid-state charge-coupled devices (CCD) or spinning discs of magnetic oil that held the sound for a short period of time and then played it back off the same disc. The diameter of the discs limited this type of delay to short delays only and the audio fidelity was poor.
There are acoustic delay lines such as the Cooper Time Cube that used two separate lengths of garden hose coiled up in a box with a microphone and speaker at each end. By virtue of the specific lengths of garden hoses inside the Cooper Time Cube, it had two fixed delay lines of 14 and 16-ms each.
Effects units with digital delay lines (DDLs) produce much better audio quality—even the early 10 and 12-bit units. One of the earliest professional digital delay units was the AMS DMX 15-80, which debuted in 1978.

Pictured: Vintage Delay Units Left: Echoplex tape-based delay. Top right: Cooper Time Cube acoustic delay. Bottom right: AMS DMX 15080S digital delay.
Of course, nowadays, software plug-ins will add space, depth, nuance, or stereo delay ambiences. Using delay affords a creative opportunity for the mixing engineer. You can add delay like a “spice” to emphasize or shine a spotlight on particular moments in a singer’s performance. Let’s take a look at using various delays in your mixing work.
Very Short Delay Ambience
We usually think of reverb as the main tool for creating ambiences in our mixes. Unlike adding reverberation, for a given amount, adding delay effects to your mix is much more noticeable, present and easier to hear. Unlike reverb, delay is not diffuse, or cloudy, and is more carefully “built” and used in music mixing. Delay ambiences such as a Haas delay are not usually mixed very loud compared to the original, dry signals because the excessive levels will result in a “hollowed out” or a comb filtered sound. Haas delays simulate flutter echoes or early reflections but without the feedback of the sound bouncing back and forth between parallel walls like real flutter echoes.
For percussive instruments, a Haas delay between a sound and its echo would be in the range of 1 to 40-ms. Because of the precedence effect, the human ear can be fooled to hear a sound and its echo as a single event. Usually, the goal with Haas and short delays is to spread a sound out of the center-panned position in a stereo mix—giving a sense of spaciousness to a simple monaural sound. Haas delays also impart a tonality change unlike using an equalizer.
A wide stereo sound field can be made from mono guitar tracks simply by duplicating the guitar track, panning the original right and then pan the duplicate track hard left and delaying it by 10 to 40-ms. It might be a good idea to take a moment to monitor this guitar and effect in mono to ensure it does not lose its character due to comb filtering.
Listening in mono always reveals polarity and phase issues immediately without using any extra equipment—you can hear it! Bear in mind, also, that comb filtering issues may also affect certain elements of your mix when it is converted to an mp3 file, so it is also worth auditioning your mix as an mp3 before making your final mix decisions.
Placing a mono backing vocal on the left side of your stereo mix and putting a delayed copy (or a time-shifted copy in your DAW) of it on the right side will produce a “carved out” and clear hole in the center of the stereo field for the lead vocal to be positioned in the center.
To apply a stereo Haas delay on a lead vocal panned to the center, the left and right delays would each be very short in the range of 15ms to 30ms and slightly offset from each other by perhaps 2 to 5ms. The lead vocal track, which is a mono point source, would then appear to widen out and occupy a larger position and importance in the mix stage.
A good stereo imaging effect is to send an instrument or vocal to a stereo delay plug-in with its 100% wet returns panned left and right. For fast tempo rock songs, use 25ms on one side and 35ms on the other—but you might want to shorten these values later on in your mix workflow.
By sending using a stereo send, you can vary the amount of delay produced from either side using the send’s pan pot. You get the maximum effect if the track you are sending from is positioned center in the mix and use the pre-fader mode on the send fader. In this way, you change the presence of this center track either deeper into and farther back into the mix or all the way out front while keeping the left and right delay returns at the same level.
Quite a lot of mixing power with just one effect!
Double-Tracking Using Delay
An often-used technique in pop music is to double-track instruments and vocals. A singer or musician would try to sing or play along as close as possible in tuning and timing to the original track. Recording a real double-track is most desirable but not every artist or musician is a good “doubler.” Depending on how good your singer or musician is at doubling themselves determines how loud it can be played in the mix without clashing. Personally, I would never mix a double-tracked vocal as loud as the lead vocal or pan them hard left and right!
It is possible to simulate double-tracking using short delays. Many prefer the sound of Artificial/Automatic Double Tracking or ADT effects. Here, you would mix the delay almost as loud as the original to produce a very tight effect with delay times at or below 15ms.
Effective ADT effects modulate the delay time slowly so that it is both ahead and behind the original track in time. Modulating the pitch very slightly along with the short delay can mimic the imperfections of an actual human double-tracked vocal performance. Again, the natural world offers the best starting point.
One interesting side benefit of double-tracking is the increase of apparent loudness. This is because there are moments where the two sounds add perfectly together and other times where they do not match exactly and still other moments the two partially cancel each other at different frequencies or they flange against each other.
The Happy Accident And Rockabilly
The first delay effects “back in the day” were accidents in the studio. Perhaps a tape recorder was playing back at the same time a singer was recording. The engineer turned up a fader accidentally and mixed the output of tape with the live vocal coming in from the microphone! Slapback echo was born!
The slapback echo heard on early Rockabilly records—Gene Vincent, Eddie Cochran, and Elvis Presley all used that distinctive effect. While recording, an additional tape recorder was used to create an echo that was mixed nearly as loud as the vocal track itself.
Thought of as special effects, musically timed delays (eighth, quarter, dotted quarter note, etc.) will ‘sink down’ into a track that is produced on a tempo grid. If you use a stereo delay with the outputs hard-panned and at exactly the same time value, the results will sound mono, or panned to the center. It is a good idea to offset those two delays by a few milliseconds—one slightly shorter and the other slightly longer.
Definitions of Terms Used In This Article
Apparent Loudness
Apparent loudness refers to the technique(s) of making an audio track (vocal or instrument or entire mix) sound louder than another track even though the two measure electrically the same. This is one of many other underlying reasons for loudness standardization in modern broadcast and streaming services.
Artificial Double Tracking (ADT) (from Wiki)
“Automatic double-tracking or artificial double-tracking (ADT) is an analogue recording technique designed to enhance the sound of voices or instruments during the mixing process. It uses tape delay to create a delayed copy of an audio signal which is then combined with the original.”
Comb Filter (from Wiki)
“In signal processing, a comb filter is a filter implemented by adding a delayed version of a signal to itself, causing constructive and destructive interference. (If displayed graphically) The frequency response of a comb filter consists of a series of regularly spaced notches, giving the appearance of a comb.”
Diffuse
A diffused sound is spread out in the sound field and has no distinct directionality or locational cues. Reverberation in a space is, by nature and its definition, a diffused sound.
Double-Track
When done properly, the slight human imperfections in timing and tuning produced by a singer or musician who sings or plays along with the original audio produces a thick and unique sound.
It’s the imperfections in a recording that make it special; sometimes the double track is behind and other times it is ahead of the original track. Other times the intonation varies as well. The constant and instantaneous changes made by the singer to adapt his/her voice, mic positioning and loudness to fit the original lead vocal cannot be emulated well because every singer does this process differently.
Flange or Flanging (from Wiki)
“Flanging is an audio effect produced by mixing two identical signals together, one signal delayed by a small and gradually changing period, usually smaller than 20 milliseconds. Varying the time delay causes these to sweep up and down the frequency spectrum.”
Flutter Echo
Flutter echoes occur in a room when sound traveling between closely spaced and parallel walls, floors and ceilings and produces a rapid series of discrete echoes that our ears discern as separate sounds, not reverb. Flutter echo is a hollow, repetitive pitched sound in small confining spaces such as concrete stairwells or tiled bathrooms where attacks are repeated with a “rat-a-tat-tat” result.
Haas Effects
The Haas Precedence effect, discovered by Dr. Helmut Haas in 1949, relies on the way our brain and ear determine the location and direction of a sound source. If two identical sounds occur within about 40-ms of each other, spatial location in space is determined by the first sound heard. It does not have to be a lot louder than the later sound either.
40-ms of delay between two identical sounds is, for most people, the point where you would hear two distinct sounds and attacks. Some can hear two attacks of the two sounds down to about 10ms so you might try Haas delay settings at around 14 to 20-ms.
In large indoor spaces—auditoriums, concert halls, churches—the walls and ceilings are much farther away and, even though they can reflect just as easily, the reflections are lower in volume and take more time to arrive at your ear.
Flutter echoes occur within the Haas delay window—under 40-ms. Sound travels a little faster than 1 foot per millisecond (Sound travels at approximately 1,130-ft/sec or 344-meters/second) You would double the distance to the reflective wall since the sound travels a round trip from the source and then back to your ear.
Mono Point Source
A distinct and solid point of sound created using a single mono track without any auditory spatial cues apart from its panned position.
Mix Stage
Implies that stereo, surround or immersive audio is thought of as a real theatrical stage with the musicians and singers arranged panoramically left to right and in depth, front to back on the stage.
Precedence Effect
The precedence effect says that the first wavefront to reach our ears will determine the direction of the source provided it is louder than the delayed sound. (See Haas Effects above)
Pre-Delay
Pre-Delay is a time delay effect placed before another processor such as a reverb. Pre-Delay puts a gap in time before the second processor adds its effect.
Post Fader
On a mixing console there are extra faders to send audio from any Main fader channel. For the most part, the default is to send “post” or after the main fader’s level setting. The main fader, when turned up, more level is sent from the send fader.
Pre-Fader
Pre-fader just routes the audio before the main fader so it is independent in level from the main fader’s setting. I.e. an independent headphone mix is usually done using pre-fader mode.
Slapback
When the delay audio output is fed back into the input of the delay, it repeats. The number of repeats depends on the amount (or level) of this feedback signal.
Originally, all delay effects came from tape recorders. The tape speed and the physical distance between the record head and the playback head would determine the delay time. Certain tape decks were preferred because of the longer physical distance between the record head and playback head. Sometimes, a certain model of tape recorder seemed to always produce just the right sounding delay timing from song to song.
On any tape recorder, using variable speed allows the time delay to be fine-tuned to a certain musical subdivision, i.e. 1/4-note, 1/8th note, or dotted or triplet timings. If the tempo changed during the song (sped up or slowed down) the speed of the tape deck could be changed during the mix to keep the slapback repeats more or less in time with the music.
Wet/Dry Balance
A mixer is usually incorporated into an effect processor that allows a certain ratio or mix of the original Dry audio signal with the output of a reverb effect called Wet. It is similar to parallel processing in that both the effect and dry signal are available for blending together in any way.
