The single most-asked question that I hear from clients and students is what level a song should be mastered to. We hear so many numbers flying around that the answer seems confusing. The answer is actually simple, and you can be creating appropriate masters for your music in no time—even if you’re not a mastering engineer and even if you don’t plan on sending your mix to a mastering engineer!
Basically, your music should feel as loud, powerful, and energetic as another song in the same genre playing at the same volume level on your monitor system. Also, your music should sound good when converted to a decent lossy file-type, like a 256kps mp3. To meet these conditions, you need to concern yourself with two simple goals.
First, match your master (its loudness and tonal balance) to a reference song played back through the same monitor system that you mix through. Second, you need to protect your master from overloading while being converted to the lossy file by controlling its peak level. You may wish to read our post on using reference songs for more info on this topic.
Control Your Peak Level
Believe it or not, you can create a completely acceptable and great sounding master without using any meters at all. I would recommend two meters, though, and the most important meter for the purpose of this article is the true peak meter. Luckily a true peak meter is part of almost every maximizer or mastering limiter plugin, so you probably already have one. True peak is a measure of the loudest instant of the music that will occur when the digital music is converted to analog—as it is played out of your interface, converter, or monitors. The true peak level may be 1 dB or more above what your DAW channel meters show (they are not true peak). So make sure your meter is a true peak meter, which is also sometimes called an inter-sample peak meter.
The reason the true peak meter is so important is that we need to leave a little digital headroom in our masters. When a file hits digital zero, or tries to go above zero (true peak), it will clip and distort the file. Your final master will also be converted into an mp3 or AAC file at some point, and the process of encoding the file will increase the level of the song even higher than your original master. This increase of level may cause additional distortion and clipping, especially if your master already peaked near digital zero. Leave a little room for the true peak level of your master to avoid this problem. I recommend 1dB of headroom, so your master should peak at -1dBFS before you convert it to an mp3 or AAC file.
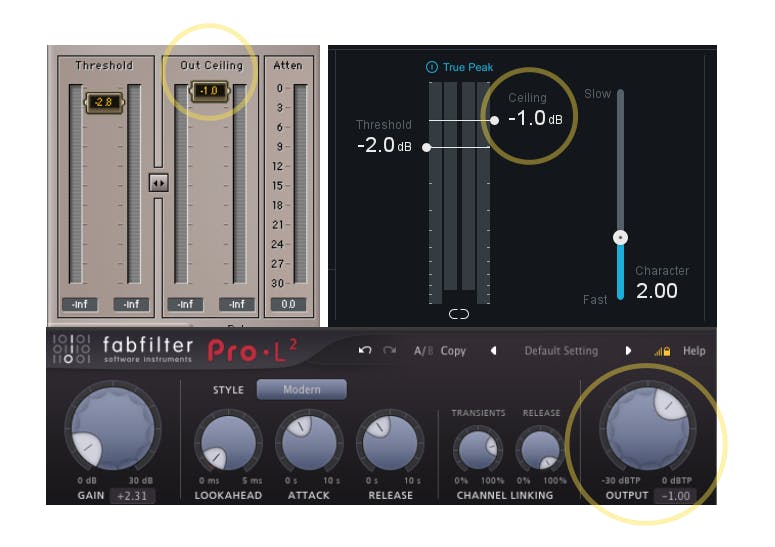
The simplest way to ensure 1dB of peak headroom is to use a maximizer or mastering limiter in which you can set your output ceiling to -1dB. All good maximizers and limiters provide this function. Setting your peak level is really a simple technical procedure that gives your song the competitive edge on streaming platforms. In the days of mastering for CD, we often let our final masters peak at digital 0 or even go into the red, but you now know better for your masters!

Find Your Average Level
The average level of your song is the loudness that you feel. Proper loudness is the result of a good production, a good mix, and good mastering. Loudness should be developed to create the musical feeling your song requires. This loudness is not a number—it’s a feeling! While you will see certain loudness recommendations, you can ignore these numbers while you are producing and mixing and simply create a song that sounds and feels like songs you wish to compete with. As mentioned earlier, this requires that you properly reference other songs while you are working.
The reason that you don’t need to use a loudness meter is that if your song/mix/master feels competitive with another song in the same genre, it will sound very similar on any streaming or distribution platform that treats your song and the reference song the same way. Even if different platforms recommend different levels, your song will compete with other songs. This is true because we don’t release different masters to different platforms. We create the one “best” version of the song and that is what goes out to the world. We have no control over what happens to the song after that!

Print Your Mix the Right Way
You may not yet know where your music is headed, but you can still print the versions that you’ll need. Print your final mix/master at whatever sample rate you are working in, as a 24-bit .wav file. This version can always be converted to a 16-bit version, mp3, AAC, FLAC, or whatever you may need. Your DAW, iTunes, or many other programs do an excellent job of converting 24-bit files to other versions. If you print a high quality version from the get-go, you always have that to work from. Of course, if you know you’ll need a 16-bit version, then print that at the same time that you print the 24-bit version. Make sure to apply dither when needed, so re-read this article if you need a refresher on bit depth.
The Fine Print
If you want to get a little more technical than this, here is some additional information to study. If the technical stuff distracts you, just follow the direction above. Most music streaming services normalize, or adjust the average volume, of every song to somewhere around -14LUFS. Not every service is exactly the same and the number chosen by each service may even change over time, so it suits us to use -14LUFS as a good average level.
Don’t master your song to -14LUFS! Most songs will not sound their best at this average loudness level because -14LUFS is somewhat quiet for most commercial music. Remember the loudness of a song depends on its density, or the presence of energy. If you shoot for -14LUFS in your mix or master, your master will probably sound a bit wimpy, unless it is a simple acoustic arrangement or a solo instrument. Commercial music ranges from about -14LUFS to as loud as -4LUFS. Streaming services simply lower the volume of all the music they play to -14LUFS so that you don’t have to change your volume control while you’re listening.
Watch our video about streaming levels for a more in-depth look at LUFS and some loudness measurements of a few famous songs that are probably familiar with.
My rule of thumb for loudness is to simply match the loudest section of the song I am working on to a good reference master. If the loudest section of my project feels similar to the reference and the mix and arrangement are well done, then the rest of the song should also sound great. This usually means that the soft parts of the song (the intro and verses) are 3 to 5 dB quieter than the loudest parts of the song (the final chorus). Your song may be more or less dynamic than this example, but this is a good starting point for most commercial music.
Best Practice
There are two simple rules to follow for success with your release: 1. Keep your peak level below -1dBFS to avoid unnecessary distortion and overloads; 2. Match the loudness and tone of your mix/master to a great sounding reference master. Now, no matter what a streaming service does to your song, it will still sound great against all the other songs on the platform.
Additional information about this topic:
Creating masters for streaming and selling
Mixing and mastering with reference tracks


