References
Engineers use reference tracks regardless of where they are in their careers. When working on your own music, reference tracks help you stay on the right path by giving your ears and brain an objective guide for making critical decisions. If you regularly work in different studios, keep a few mixes on hand that you know really well to help you quickly get used to your listening environment.
How do I choose good reference tracks?
Here are a few guidelines for choosing reference tracks:
- The reference tracks should be of the same genre as the song you’re working on.
- Make sure you choose tracks that have a similar arrangement and soundscape to the track you’re dealing with.
- Choose reference tracks you love the sound or feel of, even if you’re not a big fan of the songs themselves. One track may have an inspiring vocal sound while the other has a more appropriate groove, etc.
- And if you choose great mixes of songs you also love, you’ll be inspired and that will influence the emotions you bring out of the mix.
- Make sure you reference productions from the ‘appropriate’ era. If you’re mixing an 80s-style pop ballad, use Phil Collins’ work as a reference—at least when it comes to the huge reverbs.
- Go for commercially successful tracks. This doesn’t mean you’ve sold out, but you’ll mix in a way that competes with the style of the reference. Your client’s music doesn’t exist in a vacuum; there are other similar artists and their music needs to fit within the style they chose, whilst breaking new ground, if possible.
- It’s best to ask the artist or producer for a reference song or two. They usually have a vision for their song, which means he/she listened to some music that influenced their tastes. Don’t mix or master in the dark, ask for references. If the artists say their music sounds like nothing else, it’s up to you to find references to keep yourself on track. No music comes free of influences, regardless of what the artist tells you.
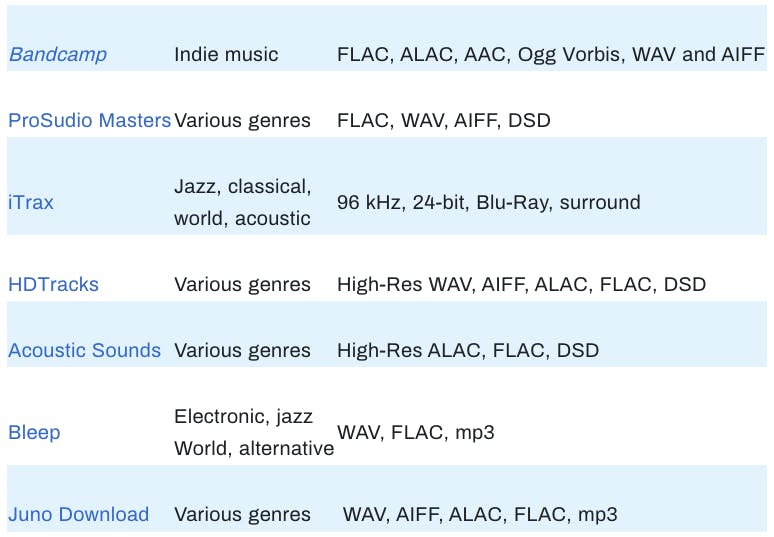
- Important: use high-resolution audio files. It’s also best to reference tracks through the same playback engine that you are mixing through. That usually means importing the reference track(s) into your DAW session. (see sidebar for a list of sites where you can purchase hi-res songs) If you have to use lossy files as a reference, be aware that it sounds slightly louder than the lossless version due to compression artifacts. I turn down mp3 reference tracks by 0.8dB – 1dB.
How to use reference tracks correctly?
Match the volume of the reference tracks to your mix/master
Our brains perceive sound as having different frequency content, depending on its loudness. As described about the Fletcher Munson Loudness Curve, at monitor levels below 85 dB, our brain focuses mostly on the midrange frequencies. At louder levels we hear the low and high frequencies more prominently, making the music sound and feel more exciting. This is one of the reasons why mixing and mastering are done at nominal/calibrated levels. Working this way ensures that our perception of frequency balances stays consistent day-to-day and project-to-project.
Why is loudness important when referencing?
Your working mix is very likely not going to be as loud as a mastered commercial release. This means that, regardless of how well you’ve done your job, your quieter mix will feel subpar when compared to your references. Since our brains interpret louder as better, we need to compensate for that and level match the reference tracks to our mix. This way, we’ll be able to compare apples to apples. Typically, you should reduce a mastered track by about 9dB to match its loudness to your mix, but don’t be worried if you need to reduce it even more! Alternately, you could insert a maximizer on your stereo bus (as the last processor) to audition how your mix will sound at a mastered level, being careful not to overprocess you mix at this stage.
What to listen for when using reference tracks when mixing or mastering?
Think in terms of a mix’s stereo field in 3 dimensions: height, width, and depth, where height generally relates to frequency content, width to the stereo image, and depth to volume levels and ambience (reverbs, delays).
Height: Compare the frequency spectrum of both your mix and the reference one and compare the elements the mixes have in common.
Width: When it comes to the stereo image, listen to how panning is used in the reference. How wide are the drums and percussion panned?. Which elements are hard-panned or spread out to the far-left and far-right?
Depth: Sounds that are close to you are perceived as being louder (duh) and brighter, and have a stronger transient and less ambience than those that are further away from you. See how your reference track places elements from front to back. If you want to push a sound further back in your mix, you can make it quieter, dip some of its high frequencies, dull its transients, or add some reverb to it.
Referencing checklist
Here’s a short checklist of some things you could check when comparing your work to a commercially released song:
Instrumental Balances:
- Does the kick drum or bass carry the bottom and how do they fit together?
- Is the lead vocal sitting on top of the instruments or is it nestled within them?
- List the main musical elements in terms of loudest to softest (lead vocal, snare, kick, bass, guitar, etc.)
- Listen to how dark/bright the vocal is compared to everything else. Is the vocal the brightest thing in the mix, or are other elements brighter?
- Do the rhythm guitars have a lot of low mids, a lot of sizzle, or are they more contained and focused around the mid frequencies?
Effects:
- Do the vocals sound very up-close and intimate, as if someone’s singing into your ears, are they controlled, powerful, a bit distant?
- What types of vocal effects are used in the reference track?
- How much effect is there on the vocal? Snare? Lead guitar?
- Are the effects wide or do some sit right behind the instrument/vocal?
Dynamics and Imaging:
- How compressed or dynamic does the entire mix feel?
- Are the drums punchy and upfront or mellow dull?
- Are sounds extremely separated or is it a “wall of sound”?
- How wide does the reference feel? What sounds make it wide?
- How much bigger is the chorus than the verse or breakdown? Where is the loudest moment of the song?
When in the process should I use reference tracks?
Inexperienced engineers tend to over-reference, relying on comparing their work with commercially successful music at every step of the process. This leads to wasting a lot of time referencing instead of mixing. Over-referencing also makes it easy to lose track of the vision you have for the song you’re working on. Use referencing to keep you true—a reality check and not a crutch.
During production, you should analyze the structure and arrangement of the songs considered to be great and find inspiration there. During recording, you and the producer should use reference tracks that inspire the feeling and emotion that you are trying to produce.
During mixing, make sure you reference the musical impact of the song. The balance of the groove vs. the vocal, the amount of low end, the height, width and depth of the song, and so on. During mastering, you should certainly reference the loudness, frequency curve, and dynamic impact of the reference track, as well as the stereo width and overall clarity.
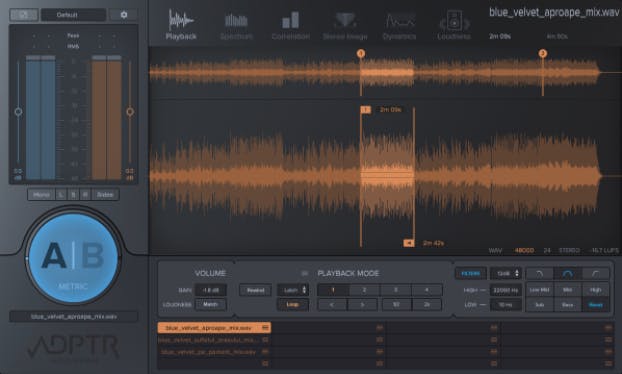
ADPTR Audio MetricAB – the king of referencing
I encourage you to use ADPTR Audio’s Metric AB from Plugin Alliance. This plugin allows you to compare your mix against any of up to 16 reference tracks of your choice simply by clicking the A/B button.

Moreover, the plugin has level matching (so loudness doesn’t fool you), pro metering tools and it’s light on your CPU. You can check how various frequency ranges from your work fare against those of a commercially acclaimed production with its built-in bandpass filters.
You can also analyze the frequency spectrum, loudness, dynamic, stereo image, and phase correlation of your song or reference tracks and even layer the meters to see more than one track’s data at once. Reference tracks can have looped sections or their playback can be controlled by the DAW transport.
Besides all the awesomeness I mentioned above, you can also listen to the songs in mono, stereo, just to the left or right side of the mix, or to the middle, or the sides.
All in all, in my book, MetricAB is leaps and bounds above any other referencing plugin.
Don’t mix with your eyes…but verify what you hear with proper metering. This topic has been covered by Brad Pack in this article over here.
Yet Another Tip: Avoid ear fatigue by taking 10-minute breaks to give your ears a break. I like to work 50 minutes and then take the last 10 minutes of each hour to check email, use the restroom, or walk outside for some air. When you get back to work, listen to one of your references for a few seconds, then listen to the work at hand for a few seconds. You’ll notice any differences between the two immediately. Trust your instincts: if you feel like your mix is very far off from the reference, then that’s the truth.
Conclusion
Use reference tracks to keep yourself from losing perspective during the production, recording, mixing, or mastering phases of the song’s journey from zero to hero. Choose appropriate tracks for comparison, and reference them whenever you’re at a loss as to what might be next on your to-do list.
Use referencing plugins such as ADPTR Audio’s MetricAB to reference not only the sonics, but also the technical aspects of great productions, such as their frequency spectrum, dynamics, and loudness.
_____________________________
Finding High-Quality Reference Tracks
Here is a list of sites where you can purchase high-resolution reference songs. There are more sites, but these sites have large collections. It’s better to purchase a reference song and import it into your DAW than to try to compare your DAW mix to music from a streaming service, plus you are supporting another artist by purchasing their song!


